Did you ever have an older Visual Foce page that a client doesn’t want to pay to have updated? But they need some extended functionality that would be rather difficult to duplicate using Visual Force? I recently had a client using an older site page with Bootstrap request that I update a page with data table values on it. The original page used the older <apex:pageBlockTable> to render the data. See the screen shot below:

So while the page looks good and works, when the page grows over a dozen we’d need to paginate the data table…fine on a PC but not so nice using a mobile device. Enter the Lightning Web Components data grid. This would be a good place to replace the <apex:pageBlockTable> with an LWC data table.
How do we accomplish this? Well, it’s not as straight forward as you may think. In order to make this all work, we’ll need to first create an Aura container which we can place on the page. Once we have an Aura container we can create the LWC component inside the Aura container. Open the Developer Console and create a new Lightning Application. This will create an Aura Application container we can host our LWC component inside of.

Since our component will need to draw on data values found in the Apex class, we can update the current Apex class to @AuraEnabled in order to gain access to the list of Orders being returned. A couple of things we’ll need to do here. First the original Apex class was designed using a wrapper class, so we have to update the wrapper class to be @AuraEnabled. We are currently using a custom Object WebOrders__c to handle the web based orders. So we’ll need to modify the class slightly to expose the public members using @AuraEnabled.
Our code might look something like this:
public class OrdersDataForGrid
{
	@AuraEnabled
	public String Id {set;get;}
	@AuraEnabled
	public String Name {set;get;}
	@AuraEnabled
	public String Account {set;get;}
	@AuraEnabled
	public String Product {set;get;}
	@AuraEnabled
	public Double Price {set;get;}
	@AuraEnabled
	public String Dosage {set;get;}
	@AuraEnabled
	public Integer Quantity {set;get;}
	@AuraEnabled
	public Double Total {set;get;}
	@AuraEnabled
	public String Status {set;get;}
	@AuraEnabled
	public String Patient {set;get;}
	@AuraEnabled
	public String Prescription {set;get;}
	@AuraEnabled
	public String PatientName {set;get;}
	@AuraEnabled
	public String userId {set;get;}
	@AuraEnabled
	public Date OrderDate {set;get;}

	public OrdersDataForGrid( WebOrder__c ord )
	{
		id = ord.Id;
		Name = ord.Name;
		Account = ord.Account__c;
		Product = ord.Pharma_Products__r.Name;
		Price = ord.Pharma_Products__r.Price__c;
		Dosage = ord.Dosage__c;
		Quantity = Integer.valueOf(ord.Quantity__c);
		Total = ord.Total_Price__c;
		Status = ord.Status__c;
		Patient = ord.Patient__c;
		Prescription = ord.Patient_Prescription__c;
		PatientName = ord.Patient_Prescription__r.Patient_Name__c;
		userId = ord.PortalUser__c;
		OrderDate = ord.CreatedDate.date();
	}

}
Now we need to update the original controller class. This class still returns the a List<OrdersDataForGrid> data type, so that doesn’t need to be changed. However, we now need to @AuraEnable the method and make sure its a public static method so it can be imported into our LWC component.
public without sharing class Orders_GridController
{
	@AuraEnabled(cacheable=true)
	public static List<OrdersDataForGrid> getOrders(String OwnerId, String filter)
	{
		String qry;

		if( OwnerId == null ) OwnerId =  ApexPages.currentPage().getParameters().get('id');
		if( filter == null ) filter = 'All';

		PortalUser__c p = [SELECT First_Name__c, Last_Name__c FROM PortalUser__c WHERE Id =:OwnerId];

		qry = 'SELECT Id, Name, Account__c, Pharma_Products__r.Name, Pharma_Products__r.Price__c, Dosage__c,';
		qry += ' Quantity__c, Total_Price__c, Status__c, Patient__c, Patient_Prescription__c, Patient_Prescription__r.Patient_Name__c, PortalUser__c, CreatedDate FROM WebOrder__c ';
		qry += 'WHERE PortalUser__c = \'' + OwnerId + '\' ';

		if( filter != 'All')
		{
			qry += 'AND Status__c = \'' + filter + '\'';
		}

		List<WebOrder__c> listOfWebOrders = Database.query( qry );

		// Put the records into a List<> of the wrapper class
		List<OrdersDataForGrid> orderList = new List<OrdersDataForGrid>();
		for( WebOrder__c o : listOfWebOrders )
		{
			orderList.add( new OrdersDataForGrid(o) );
		}

		return( orderList );
	}

}
Once we have completed that it’s time to create our Lightning Web Component. Open Visual Studio Code or Welkin Suite (or whatever editor you desire) and create the LWC component. First we’ll need a template for the Data Table. Let’s call this component orders_Grid. When we create the component bundle you’ll have the .html, .js, .css and .js-meta files in your project. Starting with the HTML page let’s create the template we will need.
<template>
    <div style="height: 300px;">
        <lightning-datatable
                key-field="id"
                data={orders}
                columns={columns}>
        </lightning-datatable>
    </div>
</template>
Now for the fun part. We have to actually “wire” everything together (see what I did there). Open the .js file and let’s start by importing the Apex class we’ll need.
import {LightningElement, wire, api} from 'lwc';
import {CurrentPageReference} from 'lightning/navigation';

import getOrderList from '@salesforce/apex/Orders_GridController.getOrders';
We import the method from the apex class using the import method. Once imported we can work with the apex class as if it’s a native Javascript class. Next we need to declare our headers for the data table.
const columns = [
    { label: 'Status', fieldName: 'Status' },
    { label: 'Patient', fieldName: 'PatientName'},
    { label: 'Product', fieldName: 'Product'},
    { label: 'Price', fieldName: 'Price', type: 'currency' },
    { label: 'Quantity', fieldName: 'Quantity', },
    { label: 'Dosage', fieldName: 'Dosage'},
    { label: 'Order Total', fieldName: 'Total', type: 'currency'},
    { label: 'Date Of Order', fieldName: 'OrderDate', type: 'date' }
];
Now that we have our data table columns we need to bind it to the actual data we’re going to use. We do this like so:
export default class Orders_Grid extends LightningElement {
    orders = [];
    columns = columns;
	portalUserId = null;
	filter = 'All';

	@wire(getOrderList, {OwnerId: '$portalUserId', filter: '$filter' })
	wiredList({ error, data }) {
            if (data) {
		console.log('results =' + JSON.stringify(data));
                this.orders = data;
        } else if (error) {
            console.log('Something went wrong:', error);
        }
    }
}
In the default of the class we’ll use @wire to call the apex class and then process the returned data. We set the result of the Apex class to the orders javascript array which will feed the data table. Now we are almost ready to update the visual force page. Before we can do that we must set the Lightning Application to load our component. Open the Lightning application and select the “Application” block on the right. Inside the application we add the component <c:orders_Grid/> which will then load the component as part of the Lightning App.
<aura:application extends="ltng:outApp" access="GLOBAL" implements="ltng:allowGuestAccess">
<!-- Define the dependencies for your LWC component -->
<c:orders_Grid/>
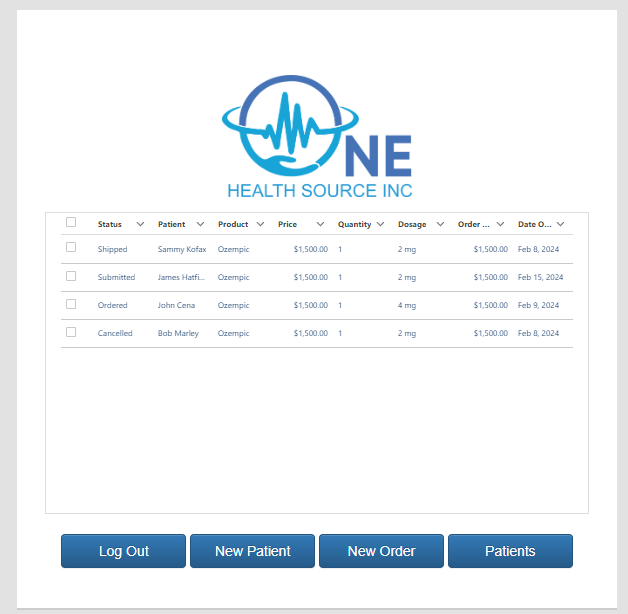
</aura:application>Now that we’ve done that lets see what our final grid page looks like.
So finally we have a one more item to address. Typically passing parameters into an Apex Class or component would be fairly straightforward as the ApexPage reference would allow you to capture it… however, in this case because the Lightning Web Component is inside an Aura container parameters aren’t accessible in the same manner. Because the CurrentPageReference component would attempt to look for parameters in the Aura container this results in NULL values. How do we fix this?
Good old fashioned JavaScript. While generally speaking your Apex class can use the ApexPages.currentPage().getParameters().get(<value>). This doesn’t help if you need the value in your inside your LWC. Enter the connectedCallback() function. We can use the connectedCallBack() to invoke a good old fashion JavaScript function to load the parameters into an array of parameters. I’ve used dozens of these in the earlier years of Visual Force Pages when I needed values on the page without calling to Apex.
So using one of these blocks of code (listed below) we can simply walk the URL and get all the query string values and put them into the parameters arry.
getQueryParameters() {
    var params = {};
    var searchParams = [];
    let search = location.search;
    search = search.startsWith("?") ? search.substring(1) : search;

    search.split("&").forEach(element => {
        if (element.startsWith("?q=") || element.startsWith("q=")) {
            let decompressedValue = decompressQueryParams(element.split("=")[1]);
            searchParams.push("q=" + decompressedValue);
        } else {
            searchParams.push(element);
        }
    });

    if (searchParams.length > 0) {
        search = searchParams.join("&");
    }
    if (search) {
        try {
            params = JSON.parse('{"' + search.replace(/&/g, '","').replace(/=/g, '":"') + '"}', (key, value) => {
                return key === "" ? value : decodeURIComponent(value);
            });
        } catch (error) {
            return params;
        }
    }

    return params;
}
Then in the connectedCallBack() we simply call this function and store the values. Like so:
connectedCallback() {
let urlParams = this.getQueryParameters();
this.myId = urlParams[‘Id’];
}
Just like that you have access from inside the LWC component to any of the outside parameters.